Learn Valuable Wet-in-Dry Watercolor Wash Techniques
Learn valuable wet-in-dry watercolor wash techniques in this in-depth video tutorial. Take your art to the next level, Beginner friendly!
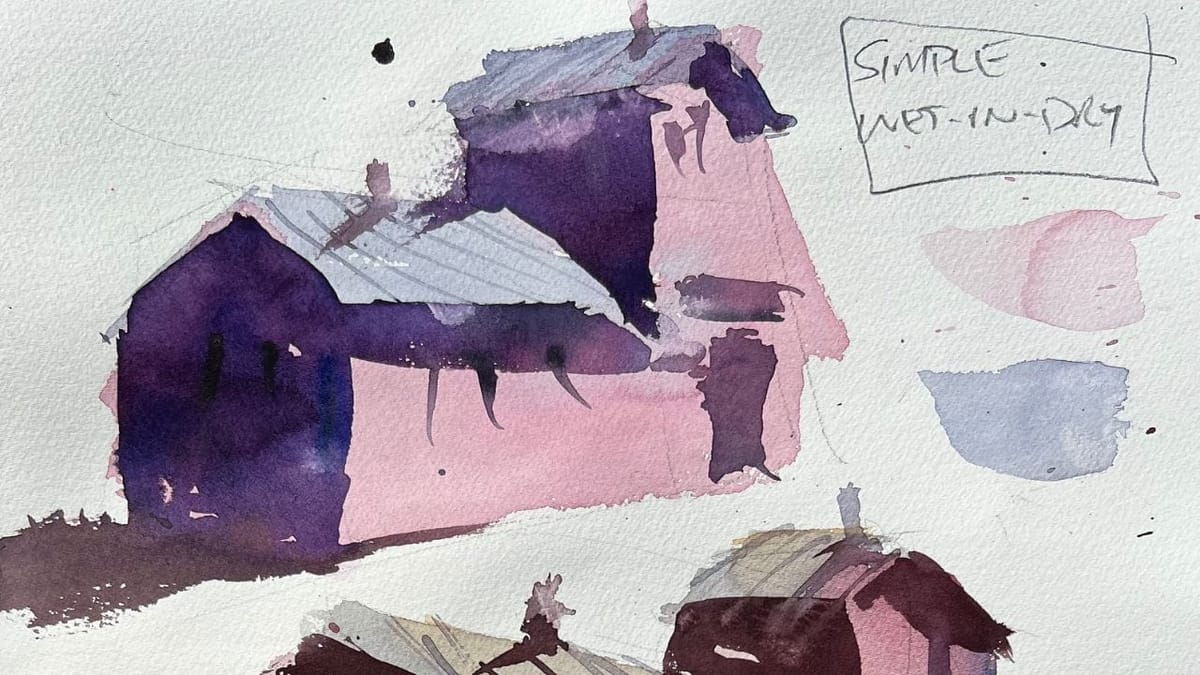
Hi Fanatics! Today we are exploring three watercolor techniques for wet-in-dry washes. This approach is safer than wet-in-dry since you have more control over the edge quality, amount of bleeding and blending, and so on.
As you may know wet-in-dry technique involves applying wet paint onto a dry surface, allowing for more control and precision in creating detailed and vibrant paintings. In this tutorial guide, we will explore the wet-in-dry watercolor wash techniques for beginners, providing step-by-step instructions and helpful tips to help you master this technique.
Understanding the Three Wet-in-Dry Watercolor Techniques
Let’s have a look at the three versions of wet-in-dry shared in the video.
Simple, non-variegated; this is using one hue which usually ends up as a flat wash. This basically means there’s little variation within the wash and it tends to be somewhat boring visually.
BUT, this doesn’t mean it’s wrong to use it in finishes art. After all, a good painting should have variety. The viewer should have every square inch of the painting begging for attention.
What’s this mean? Use it! This technique can be used to create more detail, harder edges, and to balance out others areas that have more complex washes and softer, lost edges.
Variegated washes; this involves using two, or more hues in a wash which is more interesting visually. There are many approaches to executing this from using complimentary, contrasting and warm and cool hues.
It’s good to have only one dominant hue so watch out for doing too much. Less is best. The best way to experiment is to do studies, sketches and playful doodles. It’s a great way to learn without all the pressure of painting stunning art.
As you become more familiar and confident with variegated washes, they will naturally start to make their way into the painting process, you don’t need to force it.
Complex; this one is similar to variegated but allowing the initial hues to mingle and blend more freely. So, variegated on steroids! It’s not always easy to sit back and let the colors do their thing since we humans generally have a pre-conceived idea of what the finished art should look like. The tendency is to fuss too much and the wash ends up dull because all the colors have fused into one giant gray wash.
This can be a very exciting way to paint, but use it wisely. Too much of this is one painting and the art will look too busy. If done correctly though, it can really add a layer of eye candy like no other.
There’s your recap of the three ways to explore watercolor techniques using wet-in-dry washes. Are there more? You betcha! And we will get into those later on, for now, experiment with these ideas which should bring some satisfaction to your painting process.
Didi You Miss The Wet on Wet Watercolor Technique Series?
If so, be sure to check them out! They are in order so you don’t miss out on any good tips.
Beginner series
Intermediate Series
Essential Supplies for Wet-in-Dry Watercolor Technique
Here is a list of the essential supplies I use and recommend for all levels;
Suggested Material Checklist
Materials can make or break the outcome of a watercolor study. Watch the video that covers the best watercolor materials if you need more specifics about color choices, brush sizes and such. Basically, it’s exactly what I use and recommend for all levels.
Watercolor Paints: Opt for artist-grade watercolor paints in a range of colors. Choose a basic palette that includes six primary colors (one cool and warm hue for each one including red, blue, and yellow) along with earth tones for a versatile collection.
If you aren’t aware of the six primary palette, then check out our in-depth article on how to mix watercolors for beginners. It has the exact hues I use for every painting. And, if I make changes, I always update the article so you know the exact hues that get the best results.
Brushes: Invest in a set of good-quality watercolor brushes with different shapes and sizes. Round brushes are excellent for detailed work, while flat brushes are great for larger washes. I’d recommend one medium and one large pointed round. Then get a large mop brush that will handle those initial washed that are applied in the very beginning.
You only need three brushes to do most of the heavy lifting! However, I do recommend having a dagger and possibly and Motler on hand as well. Check out the article I wrote on how to choose the best watercolor brushes if you have questions on the exact brands, sizes and such.
Paper: I highly recommend selecting watercolor paper specifically designed for this medium. Look for papers labeled “cold-pressed” or “hot-pressed” to suit your preferred texture. Experiment with different weights and brands to find the one that suits your style. Most beginners choose 140 lb. cold press to start their journey. Hot press tends to be a little slick and most used for highly detailed work and portraits.
Avoid cheap, wood pulp papers as they don’t react properly to washes and other techniques. These cheaper papers tend to break down quickly and don’t age well either, basically yellowing over time. Be sure to read the how to choose the best watercolor paper article when you have time.
If you aren’t aware of the six primary palette, then check out our in-depth article on how to mix watercolors for beginners. It has the exact hues I use for every painting. And, if I make changes, I always update the article so you know the exact hues that get the best results.
Palette: A palette is essential for mixing and diluting your watercolors. Choose a palette with wells to hold different colors and a large mixing area. Small palettes tend to get dirty too quick and I found it difficult to have enough free space to mix enough colors without having to stop everything to clean up. The Masterson Pro palette works great and available at Amazon and Blick Art.
Water Containers: Have at least two containers for water—one for rinsing your brushes and another for clean water. Make sure the containers aren’t too small, and I would recommend plastic over glass. I’ve had plenty of studio accidents and cleaning up shattered glass isn’t ideal when in a creative mode.
Masking Tape and Drawing Board: Masking tape helps secure your paper to a drawing board, keeping it flat and preventing it from warping. The tape is optional and depends if you prefer the clean edges. In the beginning you will most likely focus on sketches and studies, so maybe pass until you determine later on if you need it.
A smooth, firm board is a must! I recommend Gator foam board as it’s very sturdy, smooth and durable. Fairly inexpensive and light weight to boot. That covers materials, let’s move on to skills you need to start watercolor painting.
Step-by-Step Guide to Wet-in-Dry Watercolor Technique
Now that you have gathered your supplies, let’s dive into the step-by-step process of creating a wet-in-dry watercolor wash:
- Prepare Your Workspace; Start by setting up your workspace in a well-lit and well-ventilated area. Lay down a protective covering on your table to prevent any paint spills or stains. Organize your watercolor paints, brushes, palette, water container, and paper towels within reach. Here’s a great tutorial for how to best set up watercolor workspaces.
- Preparing Your Paper; Before applying any paint, ensure that your watercolor paper is clean and free from any dust or debris. If necessary, gently wipe the surface of the paper with a clean, dry cloth. Tape down the edges of your paper to prevent it from warping or buckling when wet.
- Mixing Your Colors; Select the colors you wish to use for your watercolor wash. Squeeze a small amount of each color onto your palette and dilute them with clean water. Use a brush to mix the colors thoroughly until you achieve the desired consistency and hue. Test the colors on a separate piece of paper to ensure they are mixed to your satisfaction. Here’s a great article for how to mixing watercolors like a pro.
- Wetting the Paper; Dip your brush into clean water and apply a thin layer of water onto the area of your paper where you want to create the watercolor wash. Make sure the entire area is evenly moistened, but avoid oversaturating the paper. The dampness of the paper will allow the paint to spread more easily.
- Applying the Paint; Once the paper is moist, dip your brush into the diluted paint and start applying it onto the damp surface. Begin with light brushstrokes and gradually build up the intensity and coverage as desired. Work quickly but carefully, as the wet-in-dry technique requires precision and control.
- Creating Layers and Blending; To add depth and dimension to your watercolor wash, allow the first layer of paint to dry partially before applying subsequent layers. This will prevent the colors from bleeding into each other and allow for more controlled blending. Use a dry brush or a clean, damp brush to blend the colors together seamlessly.
- Adding Details; Once the initial wash is dry, you can use the wet-in-dry technique to add fine details and highlights to your painting. Use a smaller brush and a more concentrated mix of paint to create intricate shapes, textures, and highlights. Take your time and work slowly to achieve the desired level of detail.
- Finishing Touches; Once you are satisfied with your watercolor wash and the added details, allow the painting to dry completely. Remove any tape from the edges of the paper and carefully trim it if necessary. You can also consider using a fixative spray to protect your artwork and enhance its longevity.
Tips and Tricks for Wet-in-Dry Watercolor Technique
To help you master the wet-in-dry watercolor technique, here are some additional tips and tricks:
- Practice on scrap paper: Before working on a final piece, practice the wet-in-dry technique on scrap paper to familiarize yourself with the process and explore different color combinations and brush techniques.
- Experiment with different brushes: Try using different brush sizes and shapes to achieve different effects and textures in your watercolor washes. Round brushes are ideal for fine details, while flat brushes are great for larger areas.
- Control the amount of water: The wetness of your paper and the amount of water in your paint will affect how the colors spread and blend. Experiment with different levels of moisture to achieve different effects.
- Layering and glazing: The wet-in-dry technique allows for layering and glazing. Layering involves applying multiple layers of paint on top of each other, while glazing involves applying thin, translucent layers of color to create depth and richness.
- Use masking fluid: If you want to preserve certain areas of your painting while applying the wet-in-dry wash, consider using masking fluid. Apply the masking fluid to the desired areas before painting, and remove it once the paint is dry to reveal untouched areas.
- Take breaks: Watercolor painting requires patience and precision. Take breaks as needed to rest your eyes and evaluate your progress. It’s important to step back and assess your work from a distance to ensure you are achieving the desired effect.
Conclusion
The wet-in-dry watercolor technique is a valuable skill for any watercolor artist to master. By understanding the principles of moisture control and applying paint onto a dry surface, you can achieve precise and detailed watercolor washes with vibrant colors and sharp edges. Remember to practice regularly, experiment with different brushes and techniques, and have fun exploring the possibilities of this versatile technique. Happy painting!